Best 3D Printers for Schools of 2026

A 3D printer in a classroom has one job, and it is not speed: it has to work when thirty students are watching. I have watched a jam turn a twenty-minute lesson into an afternoon of unclogging a hot end, and I understand why teachers hesitate before spending classroom budget on a machine that might become a very expensive dust collector. What a good school printer actually fixes is preparation time — a teacher queues a file the night before, and it prints without supervision, without an IT ticket, and without a crowd forming around a failed first layer.

My team spent six months running eight of these printers through something close to a real semester, in an after-school STEM club, a science classroom, and on a kitchen counter over winter break. Print quality and ease of use separated the field quickly, but calibration was the real dividing line: the machines that level and dial in their own first layer are the ones still printing in February.

Multi-color printing, phone control, and built-in model libraries are the features sellers push hardest, and they do earn their place for class sets and quick demonstrations. Reliability, jam recovery, assembly, and whether the thing will talk to a filtered school network matter more once the novelty wears off. Here is what held up.

1

Best Overall

Bambu Lab P2S Combo

87 /100
LBD Score Excellent

Key details

Setup
Ready to print in 15 minutes
Enclosure
Fully enclosed
Print Speed
Up to 600 mm/s
Filament Handling
AMS 2 Pro, dries to 65 °C
View on Amazon

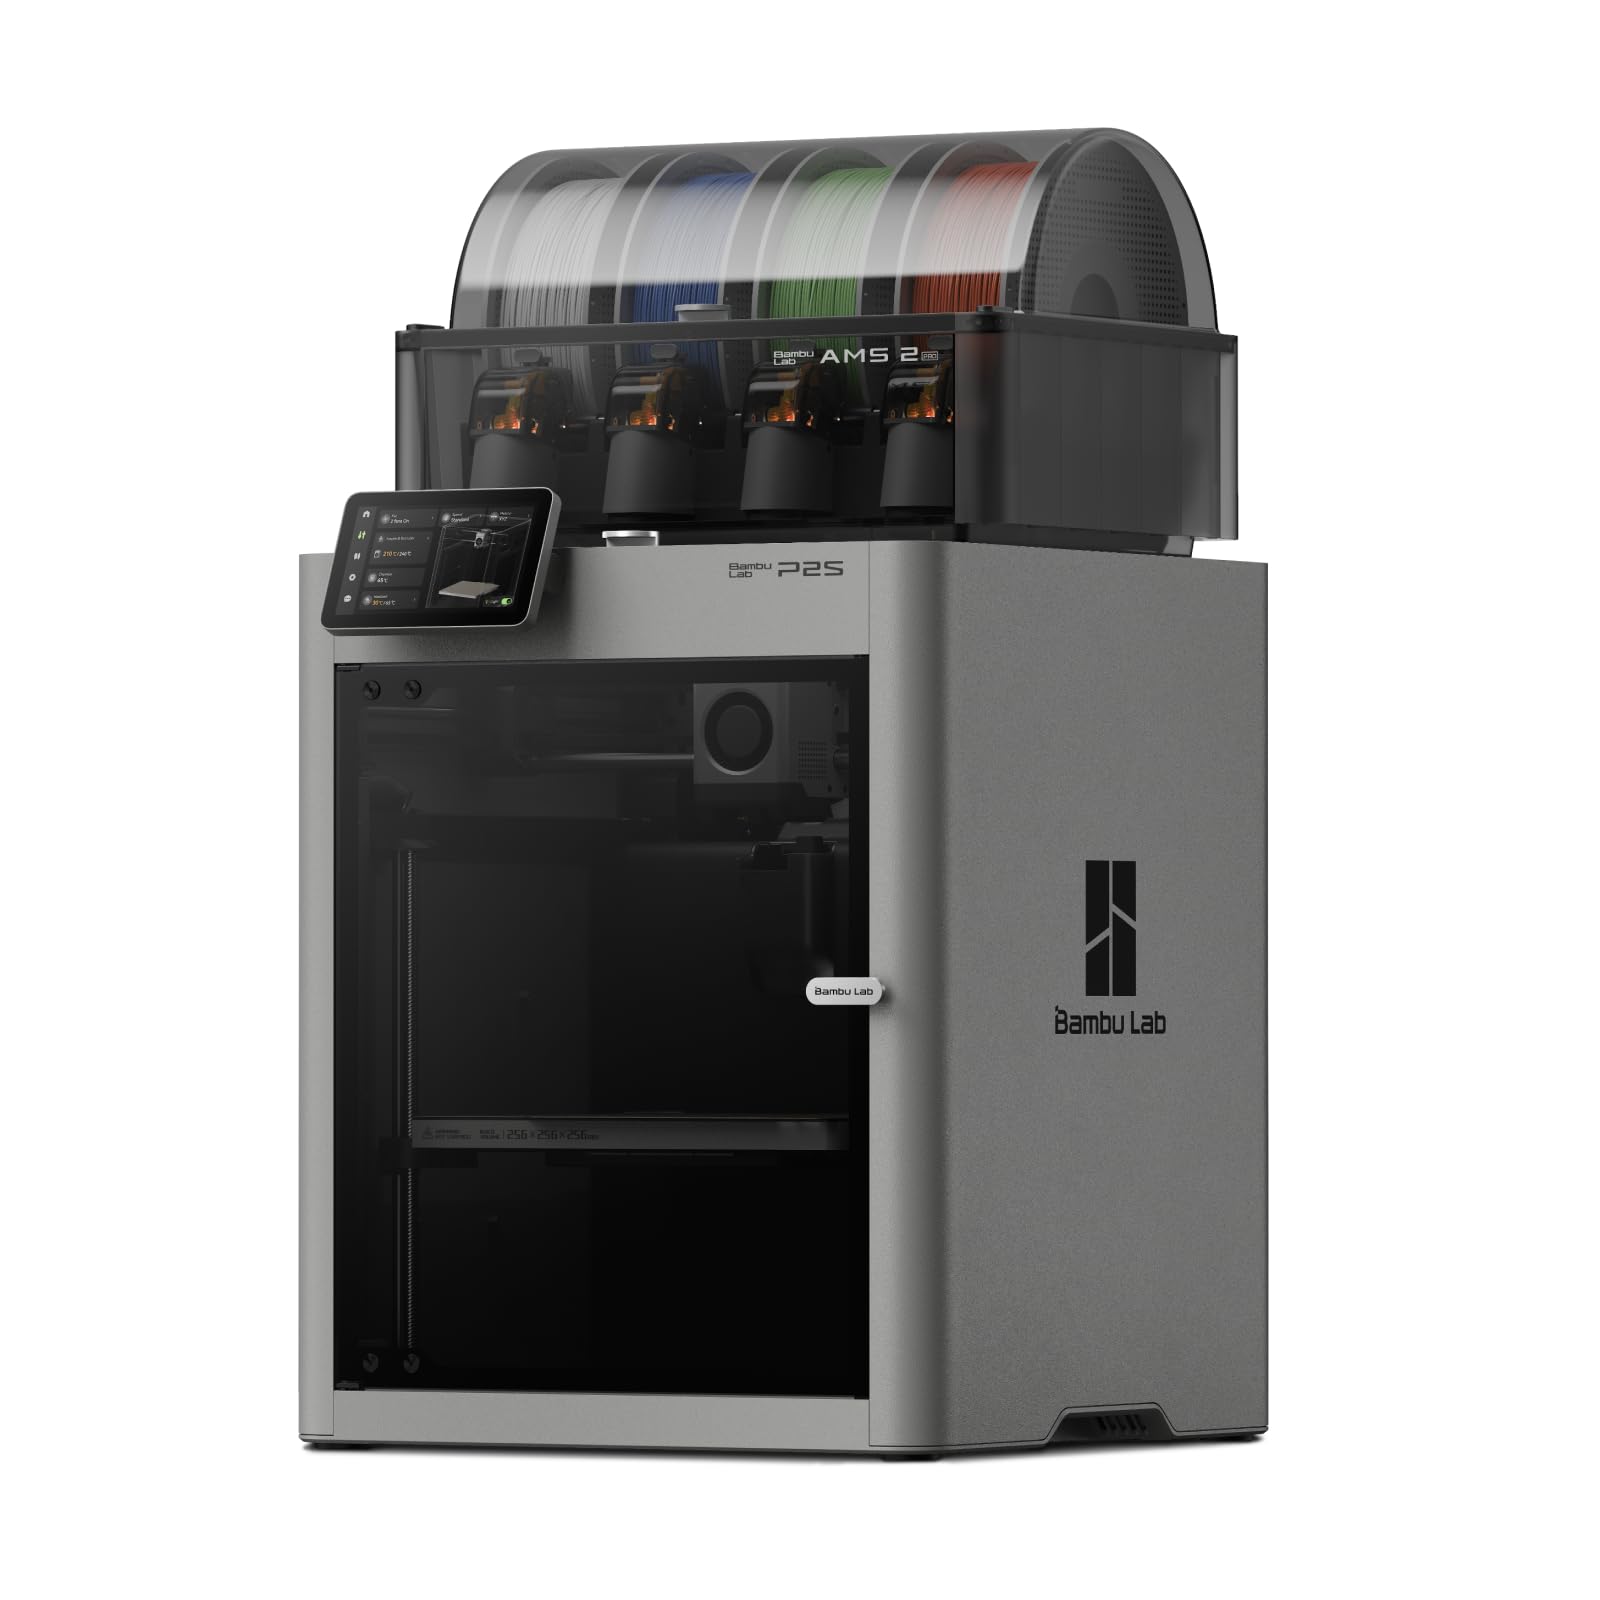
A closed chamber is the biggest favor you can do a room full of students, and the P2S has one. The hot end and the moving toolhead sit behind panels, the frame swallows most of the mechanical noise, and the chamber holds 50 °C for materials that warp on an open bench. At 18 by 22 by 18 inches it wants a permanent bench rather than a cart that gets wheeled into a cupboard on Fridays.

What settled it for us is how little attention it asks for between prints. Calibration is automatic, nozzles swap quickly, and the AI failure detection stops a job when the extrusion starts to curl off the plate instead of burying it under an hour of spaghetti. Setup is quoted at 15 minutes, which matters more than it sounds: a teacher can unpack it at 7:30 and have a test print running before first period.

The AMS 2 Pro is the part we didn't expect to care about and now would not give up. It holds spools and dries them at up to 65 °C, which is the answer to the school-storage problem where filament sits on a shelf through a humid summer and prints badly in September. It handles multi-color too; with filaments loaded, a class can print color-coded parts without anyone touching a spool mid-job. Younger students still need a hand loading it, so fill it before the lesson rather than during one.

The rest is standard Bambu ecosystem: the MakerWorld library for lesson-ready models, Bambu Studio and the Handy app for queueing jobs. What the door costs you is access. A first layer that lifts has to wait until you open the machine, and by then the print is usually a loss. We take that trade for the safety margin it buys.

Pros

  • Enclosed chamber keeps hands off hot, moving parts
  • Automatic calibration and AI failure detection
  • AMS 2 Pro dries filament at up to 65 °C
  • 15-minute setup and quiet running

Cons

  • 46.3 pounds; wants a permanent bench
  • The most expensive setup in this group
Our verdict

Our pick for a machine that lives on a classroom bench all year: enclosed, self-calibrating, and quiet enough to talk over.

Check Latest Price
2

Best Value

Bambu Lab A1

90 /100
LBD Score Outstanding

Key details

Noise
≤48 dB
Calibration
Fully automatic
Multi-color
AMS lite required
Acceleration
10,000 mm/s²
View on Amazon

The A1 is the only printer here with a noise figure on the label, and that figure is 48 dB — quieter than a room of students working. In a library corner, or a classroom where teaching carries on while a job runs, that isn't a spec-sheet nicety. It's the difference between a machine that gets used and one the teacher feels obliged to switch off.

Setup is genuinely quick. Full-auto calibration and active flow-rate compensation take the bed and the extrusion out of your hands, so the first print is a real print rather than a test cube you troubleshoot for a week. The touchscreen and app are the simplest of the full-size machines here, and the build plate releases parts with a bend rather than a scraper.

Where the A1 sits in a school is decided by the frame, not the software. There's no enclosure, so a curious hand near the nozzle or the sliding bed is a real consideration — it belongs on a back bench in a supervised makerspace, not beside the door of a walk-through lab. For an after-school club or a department that wants one approachable machine, that's a fair trade for everything it does well.

Pros

  • 48 dB operation suits a room where teaching continues
  • Full-auto calibration and flow-rate compensation
  • Touchscreen and app are the simplest here

Cons

  • Multi-color needs the AMS lite and extra tubing
  • Reliability is uneven; some units fail early
Our verdict

We point cost-conscious departments here: it calibrates itself, runs near-silent, and the first print is a real print.

Check Latest Price
3

Best for Low-Maintenance Teaching

Flashforge Adventurer 5M

84 /100
LBD Score Excellent

Key details

Nozzle
0.25–0.8 mm, quick-swap
Leveling
25-point automatic
Print Speed
600 mm/s
Build Volume
8.7 x 8.7 x 8.7 in
View on Amazon

The first thing we noticed about the Adventurer 5M is how little bench it takes: a 15.75 by 14.29 inch footprint and 23 pounds, light enough for a sturdy side table and narrow enough to sit beside a sink, which matters because a PEI plate wants warm soapy water more often than it wants a scraper.

Maintenance is where this one earns its place in a school. The magnetic plate lifts off in about three seconds, so a finished print goes straight into a hand, and the quick-change nozzle turns a worn tip into a job you finish before the next class files in. Twenty-five-point auto leveling handles the first layer, a filament sensor catches the empty spool before a lesson's worth of print disappears, and the app lets a teacher watch progress from the front of the room.

Speed is the headline — 600 mm/s, a high-flow hot end, and a 50 W ceramic heater that reaches 200 °C in about 35 seconds. The practical version of that is a part finishing inside a single period and a spool change costing less time than a bathroom pass. Swap nozzles to match the job, too: 0.25 mm for fine lettering on a name tag, 0.8 mm for a chunky chassis.

Pros

  • Plate lifts off in seconds for print removal
  • Quick-swap nozzles make upkeep a class-time job
  • 600 mm/s with a 35-second heat-up

Cons

  • 8.7-inch cube limits larger assemblies
  • Enclosure for advanced filaments sold separately
Our verdict

The printer we hand a teacher with ten minutes between periods — the plate lifts off in seconds and nozzles swap fast.

Check Latest Price
4

Best for Multi-Material Projects

Snapmaker U1

89 /100
LBD Score Excellent

Key details

Waste
Minimal purge, 5X less
Software
Snapmaker Orca, model library
Toolheads
Four, 5-second tool change
Calibration
Automatic toolhead offset
View on Amazon

Four toolheads, each parked with its own filament already loaded, turn a color change into a five-second swap instead of a purge. That single decision is why the U1 is the machine we reach for when a project needs two materials in one print, and why it leaves so little waste behind doing it.

The payoff shows up in the slicing, not the spec sheet. Rigid bodies with flexible hinges, water-soluble supports inside a closed cavity, four colors without a tower of purged filament — those are the jobs that make a design and technology project look like the thing the student drew. Automatic toolhead offset calibration and vibration compensation keep the four nozzles agreeing with each other, and the built-in model library gives a class somewhere to start.

It asks more of the teacher than the Bambu machines do. Four spools to load, four offsets to trust, and a workflow that assumes some familiarity with a slicer; the tap-and-print experience of a phone app isn't the point here. If your department has one enthusiast who enjoys that side of it, the U1 will outclass everything else on this page for multi-material work.

Pros

  • Four toolheads swap in five seconds
  • Almost no purge waste between colors
  • Rigid and flexible materials in one print

Cons

  • Open frame; no enclosure in the box
  • Large footprint and 57.9 pounds
Our verdict

We choose this one when a project needs two materials in a single print; four toolheads do it with almost no purge waste.

Check Latest Price
5

Best for Elementary Classrooms

AOSEED X-MAKER JOY AI+

82 /100
LBD Score Excellent

Key details

Enclosure
Enclosed
Precision
Up to 0.05 mm
Print Speed
220–250 mm/s, peaks to 400
Included Filament
8 PLA spools
View on Amazon

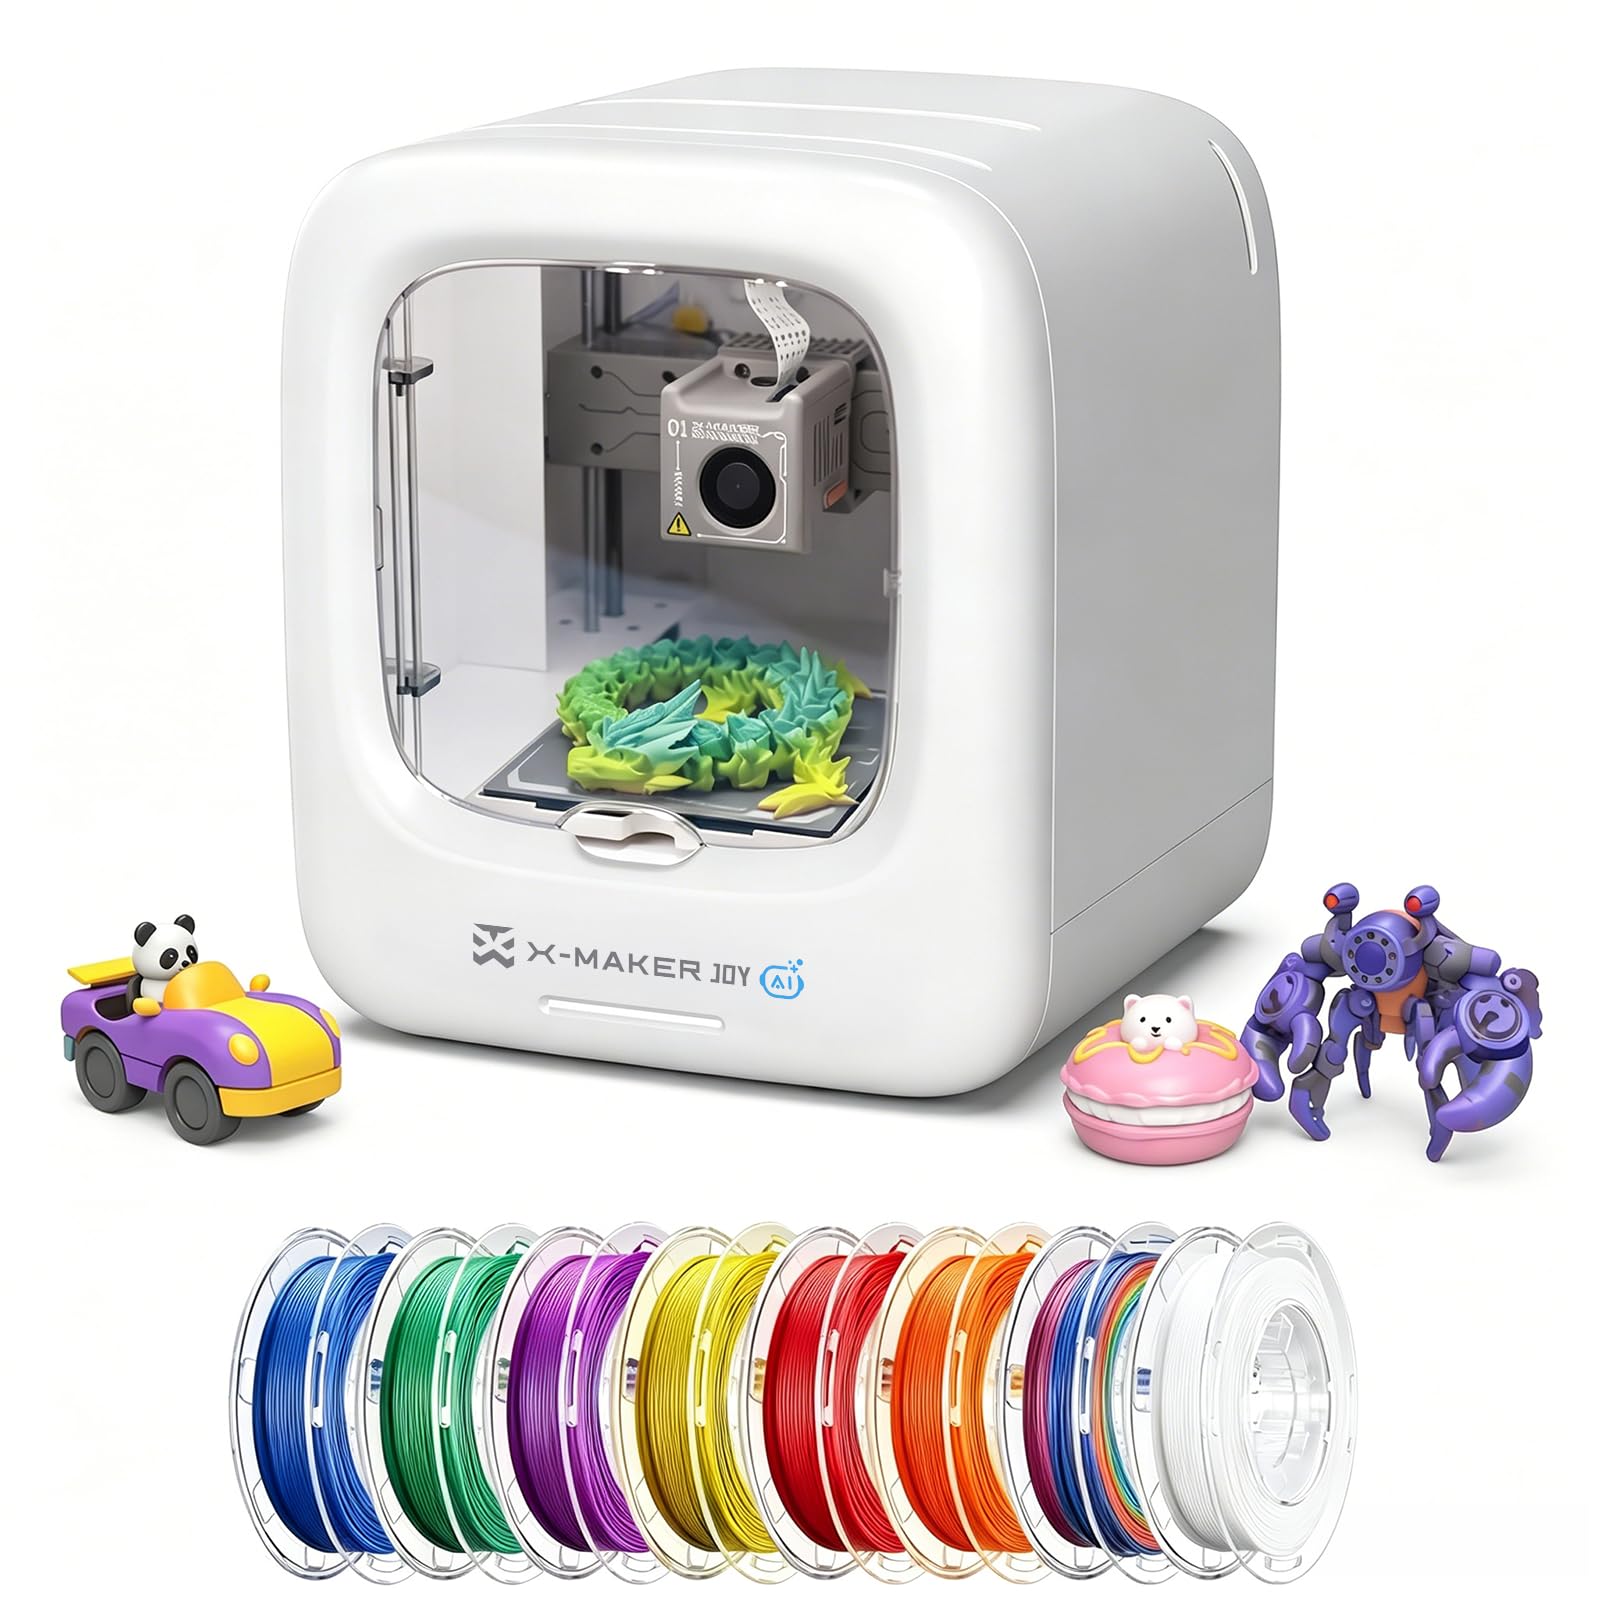
The JOY is the one printer here a primary-age student can run without a translator. Models come from the app, printing is one tap, and the AI Doodle turns a drawing, a photo, or a spoken idea into something printable — which is exactly the loop that holds a young class for more than a single session.

Eight PLA spools arrive in the box alongside access to a library of more than 20,000 models, so nobody has to buy supplies before the first lesson. The enclosed body keeps the hot parts behind a panel in a room where thirty small people move around, and at 8.8 pounds it is light enough to move between classrooms. Setup follows a guided video rather than a manual, which is the right call for the audience.

One thing to plan around: despite the eight spools, it prints one color at a time. Multi-color projects have to be designed as separate parts that clip or glue together — a perfectly good class exercise, but a surprise if you expect a four-color print from a box of four colors. Precision is quoted at 0.05 mm and speeds of 220 to 250 mm/s with peaks to 400, quick enough that a toy-sized print finishes inside a lesson.

Pros

  • Enclosed body with one-tap app printing
  • Eight PLA spools and 20,000+ models included
  • AI Doodle turns drawings and voice into models

Cons

  • Mini build volume caps project size
  • Setup and printing run through the phone app
Our verdict

The one we trust with a primary class: enclosed, one-tap in the app, and eight spools in the box.

Check Latest Price
6

Best for Individual Desks

Entina Tina2C

86 /100
LBD Score Excellent

Key details

Weight
5.28 lb
Assembly
Fully assembled
Footprint
8 x 6.5 x 10 in
First Print
About 8 minutes
View on Amazon

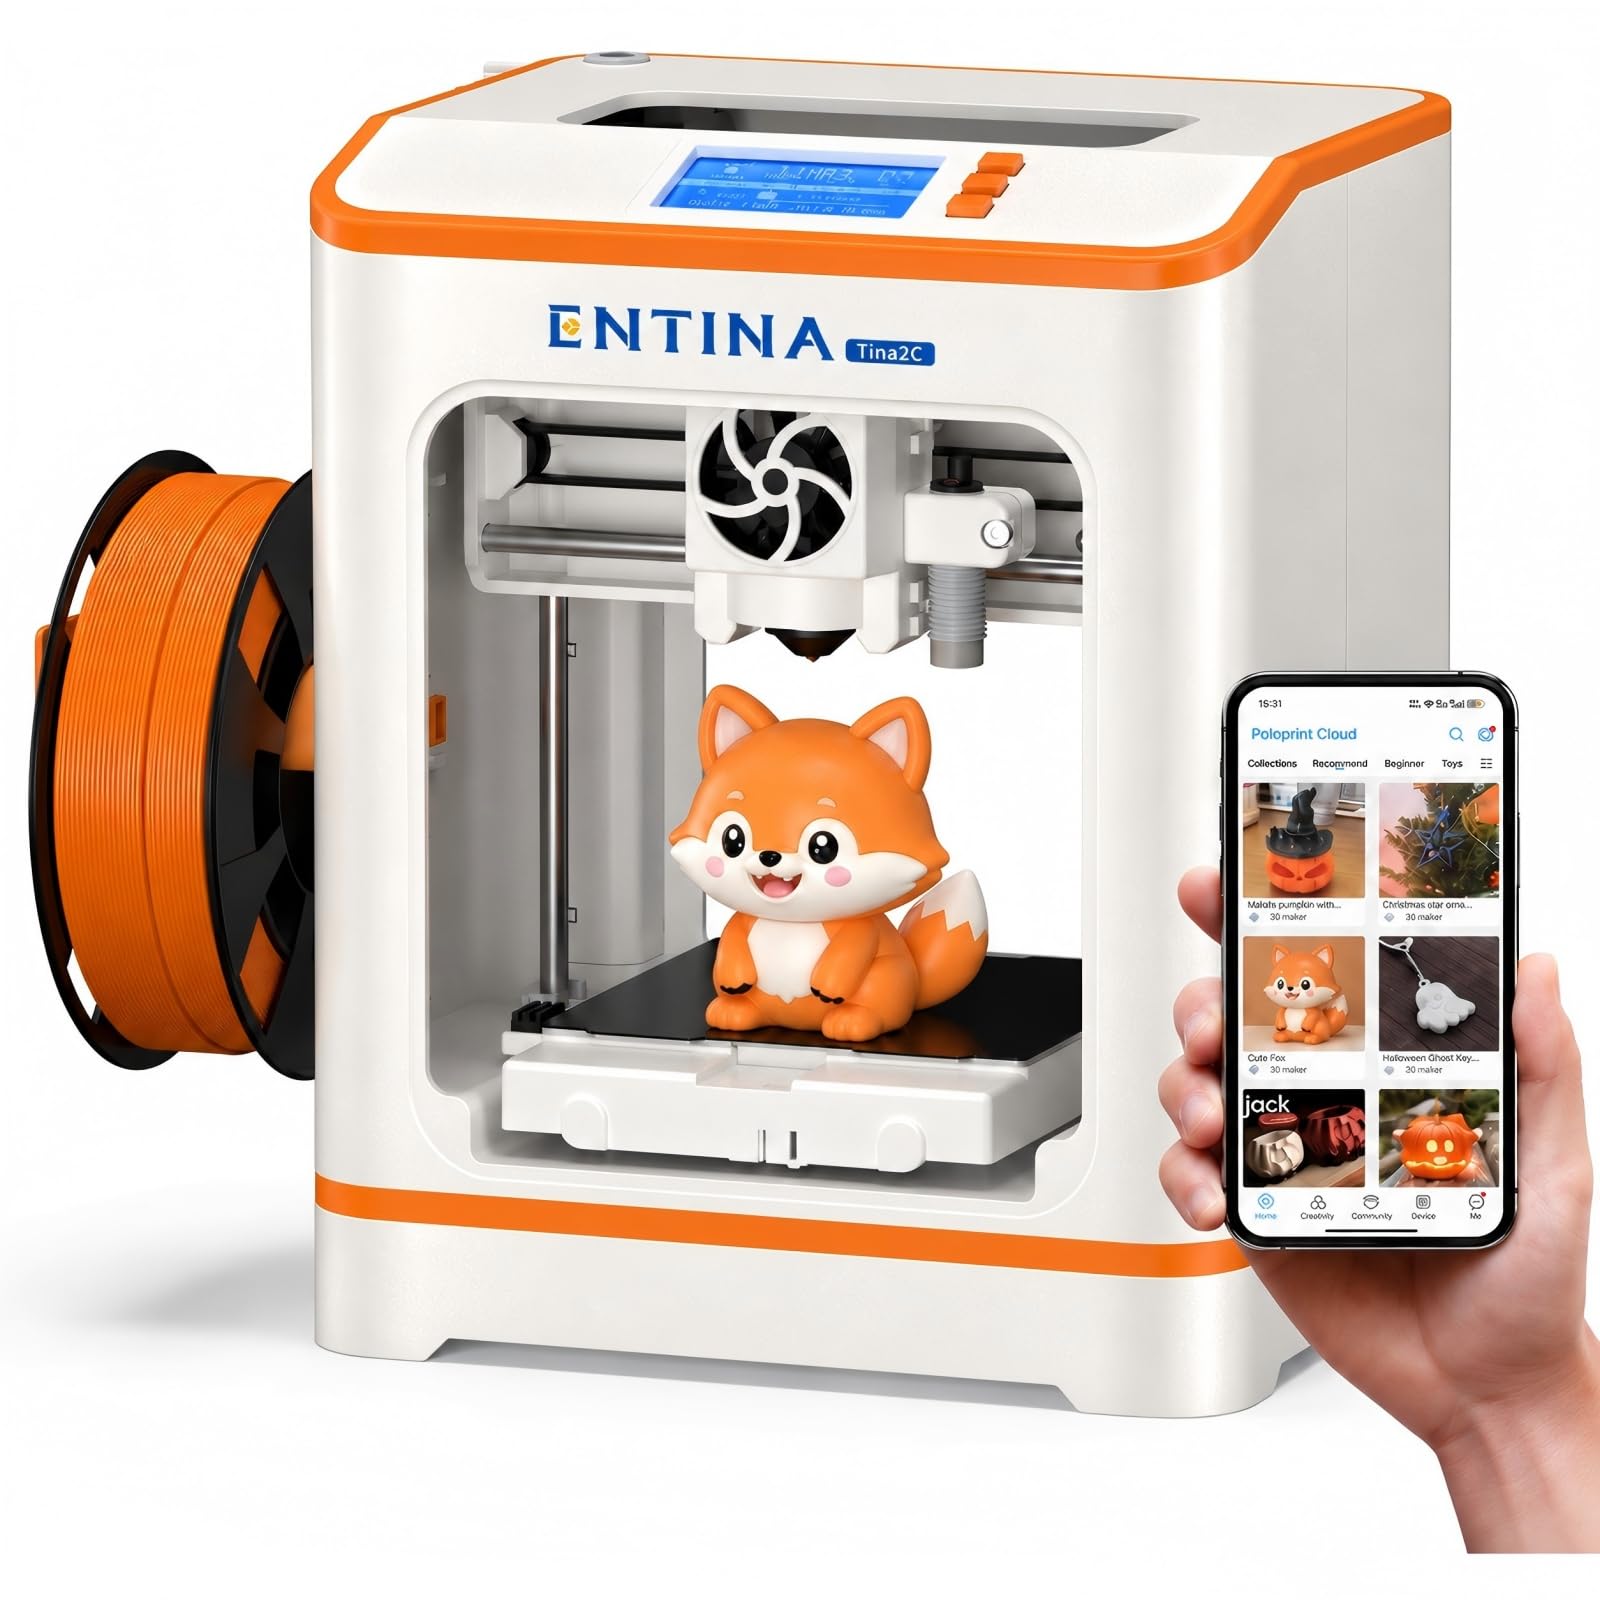
Five pounds and a footprint smaller than a sheet of paper: the Tina2C is the only printer here you can carry with one hand. That counts for more than it sounds in a school, where the machine lives on a cart, gets locked in a cupboard over the holidays, and sometimes follows the one teacher who knows how to use it.

Getting to a first print takes about eight minutes, guided step by step in the Poloprint Cloud app, and auto leveling means nobody is sliding paper under a nozzle. The magnetic plate bends to release a print, the nozzle design is meant to keep itself clear, and power-loss recovery means a tripped breaker doesn't wipe out the job. Between 2.4 GHz WiFi and a TF card, you have a route in on most networks.

It's a starter machine and it doesn't pretend otherwise. The build area suits keytags, small figures, and kits that fit in a palm; a class printing robot chassis or phone stands needs one of the bigger machines. Where it wins is arithmetic: a table of these keeps six students printing at once instead of queueing for one machine, and the cost per station is the lowest here by a distance.

Pros

  • Fully assembled, printing in about eight minutes
  • 5.28 pounds, easy to move between rooms
  • TF card printing when WiFi is locked down

Cons

  • Small build area keeps projects at trinket scale
  • 2.4 GHz-only WiFi may not join a managed school network
Our verdict

Our pick for putting a printer on every table — assembled, printing in eight minutes, and light enough to move with one hand.

Check Latest Price
7

Budget Multi-Color

Flashforge AD5X

79 /100
LBD Score Very Good

Key details

Frame
CoreXY with vibration compensation
Colors
Four, via IFS
Leveling
Full-auto
Print Speed
600 mm/s
View on Amazon

Four spools, side by side, feeding one nozzle through Flashforge's Intelligent Filament System: the AD5X is the least expensive way in this group to print four colors in a single job. Full-auto leveling, a CoreXY frame with vibration compensation, and filament backup that switches to the next spool when one runs out round out a spec list that reads like a more expensive machine.

When it's working, it's genuinely good. We were struck by how little intervention the color changes need — the machine handles the switching, and complex multi-color pieces come off looking deliberate rather than assembled. The side-by-side spool layout also keeps the whole system shallow enough to sit against a wall, which is more than the tower-style multi-color setups manage.

When it isn't working, the failure tends to be the same one: a clog or a stalled job partway through, and occasionally a connection that needs a reboot before the printer will take a file again. On a school bench that's a nuisance. On a bench where a lesson depends on the print finishing, it's the difference between a demonstration and a repair.

So this is the pick for the teacher who wants four colors, has a limited budget, and is comfortable clearing a nozzle. If nobody on staff wants that job, put the difference toward one of the Bambu machines instead — what you're paying for there is calibration and recovery, not colors.

Pros

  • Four-color printing for less than the enclosed machines
  • Filament backup switches spools automatically
  • Full-auto leveling and a rigid CoreXY frame

Cons

  • Mid-print clogs and stalls are the failure to watch
  • A Flashforge account is required to print
Our verdict

We recommend this to a teacher who wants four colors on a modest budget and is willing to clear a clog now and then.

Check Latest Price

How We Tested 3D Printers for Schools

We started by reading school-facing specs rather than marketing pages: build volume against a class-sized project, enclosed versus open frames for a room full of kids, auto-leveling, whether filament is a standard spool or a locked cartridge, and how much assembly happens before the first print. We cut anything that required more than an hour of setup or a proprietary supply chain. Eight machines made the cut.

Each one was tested for six months in the places it would actually live. In the after-school club, students in grades five through eight loaded and started prints themselves while we timed how long the first print took from unboxing, and how often an adult had to intervene. In the science classroom we ran a twenty-five-piece class set to see whether piece one looked like piece twenty-five, and we used a decibel app during a lesson to check how much of the room the printer swallowed. Overnight print jobs, set up at 4 p.m. and checked at 8 a.m., told us the most about reliability.

To pressure-test printability, we pulled filament mid-print on purpose to see whether the machine paused, recovered, or scrapped the job, and we kept a jam log for the whole six months. We ran multi-color prints and weighed the purge waste, connected every printer to a school-style filtered Wi-Fi network and to a phone hotspot, and touched the outer surfaces during long prints to judge how much heat sits where students reach. Value came down to what a printer cost per usable part, not per feature on the box.

How to Choose a 3D Printer for a Classroom

Enclosed or open frame

An enclosure does three things: it keeps the hot end and the moving toolhead behind a panel, it holds chamber heat for materials that warp on an open bench, and it muffles mechanical noise. It does not filter the air, so the printer still belongs in a ventilated room rather than a windowless store cupboard.

If students walk past the machine all day, buy enclosed — the Bambu P2S and the AOSEED JOY both put a door between a hand and a nozzle. If the printer lives in a supervised makerspace corner and money is tight, an open frame is a fair saving, provided an adult is in the room whenever it runs.

Build volume and what your class actually prints

Most school projects are small: a keytag, a bracket, a robot chassis, a phone stand. Measure the largest part in your scheme of work, add a margin, and buy for that rather than for the biggest plate you can afford. A generous build volume on a fussy machine loses to a smaller one that finishes jobs.

The Adventurer 5M's 8.7-inch cube covers most of what a class will attempt. If a part doesn't fit, the usual answer is to slice it into pieces that bolt or clip together, which is also a better design lesson than watching one giant print curl at the corners.

Setup, calibration, and who does the repairs

Pre-assembled is not the same as no assembly, and auto leveling is not the same as a perfect bed: it compensates for a bed that is out of tram, not one that is warped. What genuinely saves a teacher time is a plate that lifts off for print removal and a nozzle that swaps without a service call.

Assume someone on staff has to learn one maintenance routine, then pick the machine whose routine is shortest. On this list that is the Adventurer 5M, where the plate comes off in seconds and a nozzle change is a between-periods job.

Speed, failure detection, and the 50-minute lesson

A 600 mm/s printer doesn't produce a class set within a period, but it does mean a part finishes before the bell rather than between lessons. Two features matter more than the speed number: detection that halts a job when the extrusion fails, and recovery that resumes after a power cut. The P2S has AI failure detection; the Tina2C has power-loss recovery.

If you only get one, take the detection. A print that stops itself saves the cleanup, and cleanup is what eats the next lesson.

Accounts, networks, and offline printing

Every machine here wants an app and most want an account, which on a managed school network can be the hardest part of the install: 2.4 GHz-only WiFi, captive portals, and content filters all get between a student and a cloud-first workflow.

Before buying a class set, confirm the printer can print from a card or a stick. The Tina2C takes a TF card, the AD5X takes a USB drive, and both give you a route around a network that won't cooperate.

Frequently Asked Questions

Final Verdict

For a school that can commit one good machine and a permanent bench, the Bambu Lab P2S Combo is the printer we recommend: enclosed, self-calibrating, drying its own filament, and quiet enough that a lesson continues around it. It is the least attention a 3D printer has asked of a teacher in this group.

If budget is the binding constraint, the A1 does the same calibration work behind an open frame at a much lower price, and it belongs on a supervised back bench. If the class is primary-age, the enclosed JOY asks less of everyone, including the teacher.